Welcome to the atomic-notes
✨ POV:
Here are a couple of ideas for starting the repository:
- Make a habit of acquiring new IT knowledge every day;
- The place where I can refresh lost things;
- The one pocket for workday notes;
📝 Topics:
- Grafana LDAP Team sync
- Upgrade Ansible-Core
- Vault and signed keys by Vault
- The security on Nomad cluster
- Top 5 rare docker commands
- Grab an one file from a monorepo
- Update size of a block device
- Build a docker-image by Packer
- Vault Transit Key
- Nginx and different interfaces
- Nginx as reverse-proxy for SSH
- How to check type of linked libs
- Jenkins and Hashicorp Vault
📫 Any advice or questions
Feel free to ask questions or provide advice.
Let's roll...
Ansible
Precondition:
Let's say ansible project has similary structure:
foo_project/
  ansible.cfg
  roles/
    role_01/
      tasks/
        main.yml
      defaults/
        main.yml
  inventories/
    host_vars/
      any_host
    group_vars/
      any_group
    production
Examples:
Run any shell command on host_group
$ ansible <host_group> -m shell -a 'uptime' -vv
Escape go template {{ }} symbols
# Example 01
consul_bind_addr:  "{{ '{{ GetInterfaceIP \\\"eth0\\\" }}' }}"
consul_advertise_addr:  "{{ '{{ GetInterfaceIP \\\"eth1\\\" }}' }}"

# Example 02
UsernameTemplate: "{{ '{{ username }}' }}"
Usefull tips
--diff - for check differens
--check - just dry-run
Ansible-playbook
It is collect of task described in playbook
Tips:
- The most high priority of variable
-e EXTRA_VARS, --extra-vars EXTRA_VARS
$ ansible-playbook -i hosts --extra-vars "variable_var=foo"
Ansible-vault
Brief
Ansible-vault is util to encrypt/decrypt sensetive date.
Tips
Encrypt a single string
$ ansible-vault encrypt_string --name secret_name some_secret
Decrypt encrypted data
$ ansible-vault decrypt <file_encrypted_by_vault>
Docker-compose
Brief
The most easier way to keep config resources for running containers.
Original documentation
Limitations
- Can not migrate containers between hosts
- Haven't clusters features
- Haven't scale features
Tips
Run containers as daemon
$ docker-compose up -d
Run containers with build
$ docker-compose up --build -d
Run container as temp
$ docker-compose run <name_of_service>
Labels
That an important feature. Because can easy to find required container.
Also traefik can operate with LABELS defined on docker-compose file.
...
labels:
- stage=production
- version=${GIT_SHA}
- traefik.http.routers.josh-production.rule=Host(`example.com`)
- traefik.http.routers.josh-production.tls=true
...
As an example:
docker ps --filter label=stage=production --format {{.ID}} --all
18672fd97e94
Command
The various elegant ways to run multilines script
-
Use an entrypoint
... image: alpine:latest entrypoint: ["sh", "-c"] command: - | VAR1=$$(echo 1) echo $${VAR1} ... -
Use the pure command
... image: alpine:latest command: > sh -c "VAR1=$$(echo 1) echo $${VAR1}" ... -
Use the pure command
...
image: alpine:latest
command:
- sh
- -c
- |
   VAR1=$$(echo 1)
   echo $${VAR1}
...
Docker Engine
Brief
Docker engine is containerization technology.
Uses:
namespacescgroups
More information in Official documentation
Tips
Clean apt cache in due build process
FROM ubuntu:latest

RUN apt update \
    && apt install -y curl unzip \
    && rm -rf /var/lib/apt/lists/* \
    && apt clean
How to pass secret in build process
💡 That secrets will not be store in an image. Secret will not available after build process.
- Make sure env
DOCKER_BUILDKITdefined. - Secret available in the mounted step others steps cannot reach secret.
$ export DOCKER_BUILDKIT=1
$ docker build --secret  id=secretfile,src=<secret_path> .
Other way running as:
$ DOCKER_BUILDKIT=1 docker build --secret id=secretfile,src=<secret_path> .
Example Dockerfile:
FROM ubuntu:latest

RUN --mount=type=secret,id=secretfile,dst=/<home_dir>/.ssh/id_rsa \
    git clone git://<target_repo_with_ssh>/<name_of_repo>.git
Save stdout log from container
$ docker logs <container_name> > <filename_log> 2>&1
Check history of image
$ docker history <image_id>
Copy all data from container
$ docker export <container_id> > <name_of_tar>
Check runtime metrics
$ docker stats
Enable full access from container to GuestOS
This is UNSECURE
$ docker run -ti --privilage <image>
Copy images between two different registries
$ docker save <DOCKER_IMAGE> | gzip | pv | DOCKER_HOST=ssh://<username>@<target_host>:<target_port> docker load
Consul-template
Breif
The tool can make an easier process to get data from Hashicorp utils like as Consul, Nomad, Vault.
I think the util easy to configure, not require a lot resouces and can cover a lot case in dynamic infrastructure.
Review the examples:
- Get service from Consul and prepare vhost configurations for Nginx
- Processing rotation certificates from Vault and updated them into target hosts
Tips
Get data from Consul
Prepare config:
consul {
    address = "<consul_addr>:<consul_port>"
}
template {
  source      = "./template.d/nginx-vhost.tpl"
  destination = "/etc/nginx/conf.d/nginx-vhosts.conf"
  perms       = 0644
  command     = "nginx -s reload"
}
Prepare template:
{{ range services }} {{$name := .Name}} {{$service := service .Name}} {{$tags := .Tags | join ","}}
{{ if and ($tags | contains "traefik") ($name | contains "sidecar" | not) }}
server {
    listen 80;
    listen [::]:80;
    server_name {{$name}};

    return 301 https://$host$request_uri;
}

server {
    listen 443 ssl;
    listen [::]:443 ssl;
    server_name {{$name}};

    location / {
{{- range $service }}
        proxy_pass http://{{.Address}}:{{.Port}};
{{- end }}
    }
}
{{ end }}
{{ end }}
Sign cert from pki secret engine in Vault
Prepare config as cert.hcl:
vault {
  address      = "<vault_addr>:<vault_port>"
  token        = "<vault_token>"
  unwrap_token = false
  renew_token  = true
}
template {
  source      = "/etc/consul-template.d/templates/agent.cert.tpl"
  destination = "/etc/nginx/ssl/certs/client.nomad.key.pem"
  perms       = 0644
  command     = "systemctl reload nomad"
}
template {
  source      = "/etc/consul-template.d/templates/agent.key.tpl"
  destination = "/etc/nginx/ssl/keys/client.nomad.key.pem"
  perms       = 0644
  command     = "systemctl reload nomad"
}
Prepare template agent.cert.tpl:
{{ with secret "<vault_secret_engine_path>/issue/nomad-cluster"
    "common_name=<COMMON_NAME>"
    "ttl=24h"
    "alt_names=localhost"
    "ip_sans=127.0.0.1" }}
{{ .Data.certificate }}
{{ end }}
Prepare template agent.key.tpl:
{{ with secret "<vault_secret_engine_path>/issue/nomad-cluster"
    "common_name=<COMMON_NAME>"
    "ttl=24h"
    "alt_names=localhost"
    "ip_sans=127.0.0.1" }}
{{ .Data.private_key }}
{{ end }}
Run consul-template:
# consul-template -config=./cert.hcl
Vault
The secret store for credentials
Tips
How to create the token without TTL. Application or service can be renew a token and continue using it.
However it can be dangerous because tokens should be rotate every time for the secure reasons.
vault token create -ttl=0 -period=24hDeclarative pipeline
Tips
- Escaping symbols
'single quote
def text = '"\$ENV1, \$ENV2"';

pipeline {
    agent any;
    stages {
        stage("Escaping single quote") {
            steps {
                sh """
                    bash -c ' echo '"'"'${text}'"'"' '
                """
            }
        }
    }
}

// Output
// [Pipeline] sh (hide)
// + bash -c ' echo '\''"$ENV1, $ENV2"'\'' '
// "$ENV1, $ENV2”
Groovy.d
The tips which maybe helpful
Secret
Show secrets from Jenkins credential store
- Go to a link
https://<jenkins_link>/manage/script - Paste snippet:
com.cloudbees.plugins.credentials.SystemCredentialsProvider.getInstance().getCredentials().forEach{
  it.properties.each { prop, val ->
    if (prop == "secretBytes") {
      println(prop + "=>\n" + new String(com.cloudbees.plugins.credentials.SecretBytes.fromString("${val}").getPlainData()) + "\n")
    } else {
      println(prop + ' = "' + val + '"')
    }
  }
  println("-----------------------")
}
The simple Groovy oneline
// Use credentialId which store on Credential Stores
def credId = 'vault-token-name';


// Information regarding methods you can find here: https://javadoc.jenkins.io/hudson/util/Secret.html?is-external=true
def vaultSecret = com.cloudbees.plugins.credentials.SystemCredentialsProvider.getInstance().getStore().getCredentials(
com.cloudbees.plugins.credentials.domains.Domain.global()
).find { it.getId().equals(credId) }.getSecret().getPlainText()
Configure Opsgenie plugin
Example code
import jenkins.*

def opsgenieParams = [
    apiUrl: "https://api.us.opsgenie.com",
    apiKey: "credId",
    tags: "jenkins-stage",
    teams: "DevOps",
]

Jenkins jenkins = Jenkins.getInstance()

def opsgenie = jenkins.getExtensionList(com.opsgenie.integration.jenkins.OpsGenieNotifier.DescriptorImpl.class)[0]
def formData = [getParameter: {name -> opsgenieParams[name]}] as net.sf.json.JSONObject
def org.kohsuke.stapler.StaplerRequest request

opsgenie.configure(request, formData.getParameter['opsgenieParams'])
opsgenie.save()
jenkins.save()
Bash
Brief
ulimit, bg and etc aren't utils they are commands from bash 😄
Just type man bash to check others.
Precondition
TBD
Fill multilines data into a file without an editor
$ cat <<EOF> <path_to_file>
one line
second line
third line
EOF
The simple circle
$ for FILE in *; do echo ${FILE} - Foo; done
Find file in filesystem
/ - The path where find object
type f - The type is a file
type d - The type is a directory
name - The name object for find
-print - Additional action, like example is print
$ find / -type f -name "README.*" -print
Move job in the background
$ sleep infinity &
Show jobs in background
$ jobs
Join to background
$ fg 1
Strong recommend to use aliases
Aliases are extended function in bash and that can reduce your operations.
$ alias tailf='tail -f'
$ alias ll='ls -la'
Kill process
In case terminate a process
Common using signals:
 1       HUP (hang up)
 2       INT (interrupt)
 3       QUIT (quit)
 6       ABRT (abort)
 9       KILL (non-catchable, non-ignorable kill)
 14      ALRM (alarm clock)
 15      TERM (software termination signal)
$ kill -<signal_id> <pid>
Pipe or conveyer
- Pass value as arguments to the pipeline
# ls /home/*/.ssh/authorized_keys | xargs -I {} bash -c "echo -n {}; cat {}"
- Check counts to target IP
ss -tan | grep EST | grep <IP_DEST> | awk '{ print $4 }' | tr ":" " " | awk '{ print $1 }' | sort | uniq -c
bashrc
- Connect to host with specific port and separate ":" by ssh
Update bashrc or zshrc file
# ssh 127.0.0.1:2888

function ssh() {
  if [[ "${1}" == *":"* ]]; then
    ARG_HOST=$(echo "${1}" | cut -d : -f 1)
    ARG_PORT=$(echo "${1}" | cut -d : -f 2)
    /usr/bin/ssh ${ARG_HOST} -p ${ARG_PORT} ${@:2}
  else
    /usr/bin/ssh $@
  fi
}
Curl
Description:
Curl at first glance a simple util to make HTTP request, but it is an powerfull util to troubleshouting.
Examples:
Check TCP port is open on target host:
$ curl telnet://github.com:443 -v

*   Trying 140.82.121.4:443...
* Connected to google.com (140.82.121.4) port 443
Util
telnetdon't require to installed.
Make request with manual DNS resolve
$ curl -v --resolve github.com:8443:127.0.0.1 https://github.com:8443

* Added github.com:8443:127.0.0.1 to DNS cache
* Hostname github.com was found in DNS cache
*   Trying 127.0.0.1:8443...
* connect to 127.0.0.1 port 8443 failed: Connection refused
* Failed to connect to github.com port 8443 after 0 ms: Connection refused
* Closing connection 0
curl: (7) Failed to connect to github.com port 8443 after 0 ms: Connection refused
Curlcan make to resolve without asking DNS server or/etc/hosts
Just return HTTP_STATUS
$ curl -s -o /dev/null -I -w "%{http_code}" http://www.example.org/
Dig
DNS util provides huge actions to check domain service.
Tips
- Return from PTR record to domain name
Example will be return ip - 216.239.32.10 to ns1.google.com
$ dig -x 216.239.32.10

; <<>> DiG 9.10.6 <<>> -x 216.239.32.10
;; global options: +cmd
;; Got answer:
;; ->>HEADER<<- opcode: QUERY, status: NOERROR, id: 6569
;; flags: qr rd ra; QUERY: 1, ANSWER: 1, AUTHORITY: 0, ADDITIONAL: 1

;; OPT PSEUDOSECTION:
; EDNS: version: 0, flags:; udp: 1232
;; QUESTION SECTION:
;10.32.239.216.in-addr.arpa.	IN	PTR

;; ANSWER SECTION:
10.32.239.216.in-addr.arpa. 57143 IN	PTR	ns1.google.com.

;; Query time: 30 msec
;; SERVER: 192.168.178.1#53(192.168.178.1)
;; WHEN: Thu Feb 09 23:11:42 CET 2023
;; MSG SIZE  rcvd: 83
- Make resolve from specific DNS
Example shows as make request through 8.8.8.8.
$ dig @8.8.8.8 github.com

; <<>> DiG 9.10.6 <<>> @8.8.8.8 github.com
; (1 server found)
;; global options: +cmd
;; Got answer:
;; ->>HEADER<<- opcode: QUERY, status: NOERROR, id: 55555
;; flags: qr rd ra; QUERY: 1, ANSWER: 1, AUTHORITY: 0, ADDITIONAL: 1

;; OPT PSEUDOSECTION:
; EDNS: version: 0, flags:; udp: 512
;; QUESTION SECTION:
;github.com.			IN	A

;; ANSWER SECTION:
github.com.		60	IN	A	140.82.121.3

;; Query time: 34 msec
;; SERVER: 8.8.8.8#53(8.8.8.8)
;; WHEN: Thu Feb 09 23:14:51 CET 2023
;; MSG SIZE  rcvd: 55
Find
Brief
find util helps to search directories, files in filesystem.
Tips
Find all files that starting messages in name in /var directory
$ find /var -type f -name 'messages-*'
Grep
Brief
grep util for find string or pattern string in text file
Tips
Find regex pattern and show filename and number of line through all files in directory
grep -rnie '<string_pattern>' <directory_path>
Iptables
Brief
iptables is statefull firewall util. Also it can use for redirect network trafic.
Don't forget to read a manual man iptables
Require
rootpermissions
Tips
Show all rules in all chains in filter table
# iptables -nL
Show all rules in INPUT chain in nat table
# iptables -nL INPUT -t nat
Add rule in INPUT chain in filter table
# iptables -A INPUT -i ens160 -p tcp -m tcp --dport 53 -j ACCEPT
Add a new rule in specify line in chain
# iptables -I INPUT 1 -i ens160 -p tcp -m tcp --dport 53 -j ACCEPT
Update a general policy(ACCEPT or DROP) for specific chain
# iptables -P INPUT DROP
JQ
Easy parse from JSON to output
Brief
- Written on Python
- Don't faster
Tips
- Show only
HTTP_CODE500 and print astabtable
tail -f /var/log/nginx/access.log | \
  jq -r '[.time_local,.remote_addr,(.status | select(contains("500"))),.request_time,.upstream_response_time,.request] | @tsv'
- Show request contains a pattern
tail -f /var/log/nginx/access.log | \
  jq -r 'select(.request | contains("feedback/attach")) | [.time_local,.client_addr,.status,.request_time,.upstream_response_time,.request] | @tsv'
- Apply two sequence filters and setup limit to the request field just 80 symbols
tail -f /var/log/nginx/access.log | \
  jq -r 'select(.status != "200") | select(.request | contains("/api/health")) | [.time_local,.remote_addr,.status,.request_time,.upstream_response_time,.request[0:80]] | @tsv'
Ldapsearch
Precondition
- Check util
ldap-utilsinstalled in Ubuntu distr - Check certs installed in TLS/SSL case
Show LDAP information for person object
$ ldapsearch -H 'ldaps://<ldap_host>:636' \
             -D "<bind_dn>" \
             -w '<bind_dn_password>' \
             -b "<search_dn>" \
             "(&(objectClass=person)(sAMAccountName=<LDAP_USERNAME>))"
Libvirt
Linux virtualization tool
Tips
List of domain
# virsh list --all
Update config of VM
# virsh edit <VM>
Clone VM
Note: VM have to stopped
# virt-clone --original <name_of_vm> --name <name_of_vm> --file <new_path_to_image_vm>
Extend disk on the fly
Shutdown VM isn't require
- Identify disk, which do you want to extend
# virsh domblklist <name_of_vm>
 Target   Source
--------------------------------
 vda      /volumes/disk01.qcow2
- Using name for
TargetandVM namedefine a new size.
Usually
sizedefine in KB
# virsh blockresize <name_of_vm> vda 500G
Block device 'vda' is resized
- Check updated size
# qemu-img info /volumes/disk01.qcow2 --force-share
Troubleshouting
Case 01. In during starting VM in cockpit-ui or Terraform deploy Libvirt return error:
- System information:
- Ubuntu 20.04
- Apparmor
- Libvirt
libvirtd[18883]: internal error: qemu unexpectedly closed the monitor: 2023-03-27T11:31:54.139065Z qemu-system-x86_64: -blockdev {"driver":"file","filename":"/volumes/disk01.qcow2","node-name":"libvirt-1-storage","auto-read-only":true,"discard":"unmap"}: Could not open '/volumes/disk01.qcow2': Permission denied
Just update Apparmor template: /etc/apparmor.d/libvirt/TEMPLATE.qemu
Example fix:
#include <tunables/global>

profile LIBVIRT_TEMPLATE flags=(attach_disconnected) {
  #include <abstractions/libvirt-qemu>
  "/volumes/{,**}" rwk, # <- Add the line
}
nc
ncat is simple util for troubleshouting network
Tips:
- Starting listing any port
Don't forget if you want to use port less 1024 range, it is require
rootpermission
$ nc --listen 4096
- Check available port in target host
$ nc -vz <target_host> <target_port>
Nsupdate
Tool nsupdate relied to manage DNS records, zones and etc
Tips
- Add a new record to zone
$ nsupdate
> server ns1.example.com
> update add record01.example.com. 3600 IN A
> send
- Add a new
CNAMErecord to zone
$ nsupdate
> server ns1.example.com
> update add record02.example.com. 3600 CNAME record01.example.com.
> send
- Delete a record
$ nsupdate
> server ns1.example.com
> update delete record01.example.com.
> send
OpenSSL
Tips
In case certificate looks like binary.
Try to check it
$ openssl x509 -inform der -in <path_cert>
Mutate DER to PEM
$ openssl x509 -inform der -in <path_cert> -outform PEM -out <path_cert_pem>
RDPGW
Brief
RDPGW is an util which implementation Microsoft Remote Desktop Gateway Protocol written on GO. The util can run on Linux OS.
Let's say, entrypoint is 443 port to reach our infrastructure. How we can reach RDP service from outside? The answer is a RDP reverse-proxy.
Scheme:
flowchart LR
    A[User] -->|TCP/443| B(LoadBalancer)
    B --> C{RDPGW}
    C -->|TCP3389| D[XRDP]
Tips:
- Authentication
localmeans Linux OS already existssssdservice can get LDAP users XRDPusessssdfor verify and auth users- Build process reviewed detail in original repo
- Don't forget about certs
- Should be running two processes
rdpgw-authandrdpgw
Config RDPGW
# web server configuration.
Server:
  Authentication:
   - local
  # The socket to connect to if using local auth. Ensure rdpgw auth is configured to
  # use the same socket.
  AuthSocket: /tmp/rdpgw-auth.sock
  # The default option 'auto' uses a certificate file if provided and found otherwise
  # it uses letsencrypt to obtain a certificate, the latter requires that the host is reachable
  # from letsencrypt servers. If TLS termination happens somewhere else (e.g. a load balancer)
  # set this option to 'disable'. This is mutually exclusive with 'authentication: local'
  # Note: rdp connections over a gateway require TLS
  Tls: auto
  # TLS certificate files
  CertFile: server.pem
  KeyFile: key.pem
  GatewayAddress: localhost:8443
  Port: 8443
  Hosts:
  - localhost:3389
  #HostSelection: false
  SessionKey: thisisasessionkeyreplacethisjetz
  SessionEncryptionKey: thisisasessionkeyreplacethisjetz
  SessionStore: cookie
Caps:
  TokenAuth: false
  # connection timeout in minutes, 0 is limitless
  IdleTimeout: 10
  EnablePrinter: true
  EnablePort: true
  EnablePnp: true
  EnableDrive: true
  EnableClipboard: true
Client:
  # this is a go string templated with {{ username }} and {{ token }}
  # the example below uses the ASCII field separator to distinguish
  # between user and token
  UsernameTemplate: "{{ username }}"
  # rdp file settings see:
  # https://docs.microsoft.com/en-us/windows-server/remote/remote-desktop-services/clients/rdp-files
  NetworkAutoDetect: 0
  BandwidthAutoDetect: 1
  ConnectionType: 6
  SplitUserDomain: false
SED
Brief
Util for parse text and make change on the fly.
Tips
Replace a string on the fly
Let's image the file service.hcl:
service "%NAME_OF_SERVICE%" {
    name    = "name"
    provide = "consul"
}
The goal is change %NAME_OF_SERVICE% to other value, as instance EXAMPLE:
sed -i -e 's/%NAME_OF_SERVICE%/EXAMPLE/g' service.hcl
Result:
service "EXAMPLE" {
    name    = "name"
    provide = "consul"
}
SS
Network util to investigate sockets.
That util as alternative to netstat. Because the last is depricated.
Tips
Sometimes the faster way to find which a service listen port.
# ss -panl | grep 4422

tcp   LISTEN 0   128   0.0.0.0:4422   0.0.0.0:*   users:(("docker-proxy",pid=266142,fd=4))
That means the service docker-proxy binds a port 4422 and PID is 266142.
Show all LISTING socket
rootpermission isn't require
$ ss -tul
Show all LISTING socket and process
It is require
rootpermission
# ss -tupl
Calculate and sort type of connections
# ss -tan | awk {'print $1'} | cut -d: -f1 | sort | uniq -c | sort -n
Show count of requests by IP_ADDR
# ss -tan | grep EST | grep <IP_ADDR> | wc -l
Show count of requests by IP_ADDR. The same as above with different output.
# ss -tan | grep EST | grep <IP_ADDR> | awk '{ print $5 }' | tr ":" " " | awk '{ print $1 }' | sort | uniq -c
SSH
Tips
Static config
Util ssh able to using predefined configurations.
The most popular place to check ~/.ssh/config, /etc/ssh/ssh_config
Example:
Host baloo
   Hostname <hostname>
   Port <port>
   User <username>
   LocalForward 3000 localhost:3000
   LocalForward 8080 localhost:8080
   LocalForward 4646 localhost:4646
   LocalForward 9090 localhost:9090
   ForwardAgent yes
Hostname baloo like an alias will using to connect via SSH.
$ ssh baloo
Generate key
$ ssh-keygen -t ed25519
Copy a generated key into a target host
$ ssh-copyid -l <username> <target_host>
Connect to host through LoadBalancer
- LoadBalancer have to know about HostSNI which passing in request;
- Resolve will be running on LoadBalancer side;
- Source host might carreless about
target_hostFQDN.
Scheme:
flowchart LR
    A[User] -->|TCP/443| C(LoadBalancer)
    C -->|TCP/22| D[SSH]
$ ssh -o "ProxyCommand=openssl s_client -quiet -servername %h -connect <loadbalancer_host>:<loadbalancer_port>" <target_host>
Make a tunnel between source host and target
Imagine a situation on target_host exists to running a process on loopback interface, which not availabled outside.
$ ss -tanpl | grep 127.0.0.1

LISTEN  0        1024           127.0.0.1:8080          0.0.0.0:*
We can make to able reacheble from source_host thought ssh util.
$ ssh -L 127.0.0.1:8080:8080 <target_host>
How to transfer files through SSH connection
Basically rsync or scp can transfer data through SSH connection.
However in case when just pure SSH you also can doing that.
Transfer files from localhost to the remote host
$ tar -czf - <SRC_FOLDER> | ssh <REMOTE_HOST> tar -xzf - -C <DEST_FOLDER>
Transfer data from the remote host on localhost
$ ssh <REMOTE_HOST> tar -czf - <SRC_FOLDER> | tar -xzf - -C <DEST_FOLDER>
ssh-agent
The util ssh-agent provide to make easy process to forward auth through other host/hosts.
$ eval (ssh-add)              # Sometime requires to use `eval` to init ssh-agent
$ ssh-add                     # Add key to ssh agent
$ ssh-add -L                  # Check already added keys
$ ssh <target_host> -A        # Enable Agent-Forwarding(On target host also have to enabled)
<target_host> $ ssh-add -L    # Check already added keys on target host after login on target host
$ env | grep SSH_AUTH_SOCK    # Place where storing ssh-agent sock
Sshuttle
It is perfect util if you want to forward traffic through ssh tunnel without pain.
Install:
$ pip install sshuttle
Tips:
- Run as daemon and forward traffic for 192.168.10.0/16 subnet though ssh host
# Require `root` permission

# sshuttle -r <user>@<host> 192.168.10.0/16 --daemon
How it works underhood
Util sshuttle create iptables rules in different tables and linux kernel operate next steps.
Systemd
It is a successor init.
Tips
- Check status of unit
$ systemctl status <unti>
- List of all units
$ systemctl list-units
- Listing logs by unit
$ journalctl -f -u <unit>
Tcpdump
Brief
tcpdump is a great util for dump and capture a network traffik
Require root permissions to run and assign network interfaces
Tips
- Capture network traffic and filtering just 80 port in ALL interfaces
# tcpdump -npi any port 80
- Carture network traffic and filter just destination 53 port in ALL interfaces
# tcpdump -npi any dst port 53
- Apply several filters as destination port and host
# tcpdump -npi any dst port 22 and host 127.0.0.1
WGet
Basically curl can replace that tool. However sometime will be useful know some tricks.
Compare with curl, wget can download recursive and support only HTTP, HTTPs protocols.
- Get only responce without garbage info
$ wget -qO- https://rickandmortyapi.com/api/character/1
- Get HTTP header as responce
$ wget -S -q https://rickandmortyapi.com/api/character/1
Postgres
Relation dababase
Tips
Just connect to Postgres in localhost
% psql
Make backup a full backup
% pg_dumpall > full_dump.sql
Check tablespaces
postgres=# \db
Check roles:
SELECT * FROM pg_roles;
Update password on Role:
ALTER ROLE replica_user ENCRYPTED PASSWORD '<PASSWORD>';
Postgres 13 replication
Master node
Create role with replication permission
CREATE ROLE replica_user WITH REPLICATION LOGIN PASSWORD '<PLAIN_PASSWD>';
Update pg_hba.conf to make connection between master and replica nodes
...
host  replication   replica_user  172.16.10.0/24   md5
...
Check backup/steaming
SELECT client_addr, state FROM pg_stat_replication;
Replica node
Stop postgresql instance
Remove old data from PG_DATA directory
Run backup
pg_basebackup -h 194.195.208.82 -U replica_user -X stream -C -S replica_1 -v -R -W -D $PG_DATA
Modules
Preconditions:
Python includes several preinstalled modules
How to check available modules without pip, conda and so forth
$ python
>>> help("modules")
Or as oneline
$ python -c "help('modules')"
Module http server.
Python can run a http server outbox.
If you want to assign a port from range less 1500 that requires root premissions.
$ python3 -m http.server 3000
Module json improves an output.
Python exists a json module. Module parses and showes any valide json in readable format.
$ curl https://rickandmortyapi.com/api/character/1 -s | python3 -m json.tool
In case shows only the key as name
$ curl https://rickandmortyapi.com/api/character/1 -s | \
  python3 -c "import json,sys;print(json.load(sys.stdin)['name'])"
Poetry
Brief
Poetry is management dependency and packaging tool in Python.
Collobarate pyenv and poetry utils make process developing a really easy, because your envs full separated.
Links
Preconditions
- Any python installation
- Poetry installed
Initialition project
First initialition project requres to prepare pyproject.toml file that contains spec information.
Follow to interative actions.
$ poetry init
Add package in project
After have been added any python module the project dir will be contain poetry.lock file a defined module and spec version and dependecies.
$ poetry add hvac
Poetry as virtual env and dependency management
In case to restore a project environment. Poetry will read poetry.lock, collect and install all modules with dependencies.
$ poetry install
Git
Topics
How to public static site to GitHub Pages
How to use GitHub Actions and GitHub Pages
GitHub provide an oppotinuty to hosting static site from Markdown documentation
- Create structure like as
.github/workflowsin your project - Create file with content as described below
Repository contain
book.yaml, src/SUMMARY.md and etcbecause I usemdbookto serve static page.
# This is a basic workflow to help you get started with Actions

name: CI

# Controls when the workflow will run
on:
  # Triggers the workflow on push or pull request events but only for the "main" branch
  push:
    branches: [ "main" ]
  pull_request:
    branches: [ "main" ]

  # Allows you to run this workflow manually from the Actions tab
  workflow_dispatch:

# A workflow run is made up of one or more jobs that can run sequentially or in parallel
jobs:
  # This workflow contains a single job called "build"
  build:
    # The type of runner that the job will run on
    runs-on: ubuntu-latest

    # Steps represent a sequence of tasks that will be executed as part of the job
    steps:
      # Checks-out your repository under $GITHUB_WORKSPACE, so your job can access it
      - name: Checkout project
        uses: actions/checkout@v3
        with:
          path: docs

      # Runs a set of commands using the runners shell
      - name: Install MDBook
        run: cargo install mdbook mdbook-emojis

      - name: Build docs
        run: mdbook build docs

      - name: Upload artifact
        uses: actions/upload-artifact@master
        with:
          name: page
          path: docs/book
          if-no-files-found: error

  deploy:
    runs-on: ubuntu-latest
    needs: build

    permissions:
      pages: write      # to deploy to Pages
      id-token: write   # to verify the deployment originates from an appropriate source

    environment:
      name: github-pages
      url: ${{steps.deployment.outputs.page_url}}

    steps:
      - name: Download artifacts
        uses: actions/download-artifact@master
        with:
          name: page
          path: .

      - name: GitHub Pages configuration
        uses: actions/configure-pages@v1

      - name: GitHub Pages upload artifact
        uses: actions/upload-pages-artifact@v1
        with:
          path: .

      - name: Deploy to GitHub Pages
        id: deployment
        uses: actions/deploy-pages@v1
How to merge two repos
Just imagine we have two git repos and one of them haven’t update a lot of time. We want to merge it. How we should to do it the situation. Don’t forget exists lasted changes in repo
$ git fetch -ap
$ git pull
First of all we need add remote source
$ git remote add gerrit ssh://gerrit.com:29418/XXX/XXX
Check it. Should be two remotes origin and second remote url gerrit
$ git remote -v

# Output
gerrit	ssh://gerrit.com:29418/XXX/XXX (fetch)
gerrit	ssh://gerrit.com:29418/XXX/XXX (push)
origin	https://github.com/YYYY/YYYY (fetch)
origin	https://github.com/YYYY/YYYY (push)
Call master branch from other remote with prefix. That action to do more easy to filter in git log and merge branch in future
$ git checkout -b gerrit gerrit/master
Now need choice branch with missing changes
$ git checkout gerrit
Merge changes from origin repo which contain lasted changes
$ git merge origin/master
Add new commit
$ git commit -a -m "Sync"
I recommend to use squash, if we wouldn’t like add each commit separately
$ git rebase -i gerrit/master
Finally push to gerrit repo
$ git push gerrit HEAD:refs/for/master
It is all.
Grafana OSS and LDAP Team sync
That feature available only on Enterprise edition. However spend some time to investigate opensource repo and the solution was found.
Note: The patch was tested on 11.5.1 version
Here I would like to share git-patch as draft.
How to implement the git-patch
- Clone original version
git clone https://github.com/grafana/grafana.git
- Checkout
v11.5.1version
git checkout v11.5.1
- Apply git-patch
git apply ldap_team_sync.patch
- Build docker image
make build-docker-full
Last step is creating a docker image grafana/grafana-oss:dev.
Run container
-
Setup LDAP config to connect into your AD resource
-
Provide
config.iniwith defined Team based on LDAP Group
[[servers.team_mappings]]
team = "g_o_admin"
group_dn  = "CN=G_O_Admin,OU=Groups,DC=domain,DC=local"
email      = "no_reply@domain.local"
org_id    = 1
[[servers.team_mappings]]
team = "g_o_staff"
group_dn  = "CN=G_O_Staff,OU=Groups,DC=domain,DC=local"
email      = "no_reply@domain.local"
org_id    = 1
-
Login with ldap account which has one of provided group
-
Check teams in Grafana UI. The user has to assigned into the group as
Admin
Encountered challanges during Ansible upgrade.
Ansible-core 2.17.7 and Python 3.8 on Ubuntu18.04
Issue:
By default ubuntu18.04 has preinstalled python3.6. However Ansible 2.17.7 requires Python 3.7 or above on target host.
(Link to Ansible Matrix)[https://docs.ansible.com/ansible/latest/reference_appendices/release_and_maintenance.html#ansible-core-support-matrix]
However, ansible 2.17.7 still uses /usr/bin/python3 instead takes the defined ansible_python_interpreter variable.
Error in due execution:
Traceback (most recent call last):
  File "<stdin>", line 107, in <module>
  File "<stdin>", line 99, in _ansiballz_main
  File "<stdin>", line 44, in invoke_module
  File "<frozen importlib._bootstrap>", line 971, in _find_and_load
  File "<frozen importlib._bootstrap>", line 951, in _find_and_load_unlocked
  File "<frozen importlib._bootstrap>", line 894, in _find_spec
  File "<frozen importlib._bootstrap_external>", line 1157, in find_spec
  File "<frozen importlib._bootstrap_external>", line 1131, in _get_spec
  File "<frozen importlib._bootstrap_external>", line 1112, in _legacy_get_spec
  File "<frozen importlib._bootstrap>", line 441, in spec_from_loader
  File "<frozen importlib._bootstrap_external>", line 544, in spec_from_file_location
  File "/tmp/ansible_setup_payload_gkarwtna/ansible_setup_payload.zip/ansible/module_utils/basic.py", line 5
SyntaxError: future feature annotations is not defined
Solution #1:
To install python3.8 via apt and OS has two python versions python3.6 and python3.8.
apt install python3.8
Install python3-apt
apt install python3-apt
Update symlinks for packages
cd /usr/lib/python3/dist-packages
ln -s apt_pkg.cpython-36m-x86_64-linux-gnu.so apt_pkg.so
ln -s apt_inst.cpython-36m-x86_64-linux-gnu.so apt_inst.so
Solution #2:
Update symlink for python3
ln -s /usr/bin/python3.8 /usr/bin/python3
Ansible-core 2.17.7 and Ubuntu24.04
Issue:
***********************************************************************************************
fatal: [HOSTNAME]: FAILED! => changed=false
  cmd:
  - /usr/bin/python3
  - -m
  - pip.__main__
  - install
  - stormssh
  - pyopenssl
  msg: |-
    stdout: Collecting stormssh
      Using cached stormssh-0.7.0-py3-none-any.whl
    Requirement already satisfied: pyopenssl in /usr/local/lib/python3.12/dist-packages (25.0.0)
    Collecting flask (from stormssh)
      Using cached flask-3.1.0-py3-none-any.whl.metadata (2.7 kB)
    Collecting paramiko (from stormssh)
      Using cached paramiko-3.5.0-py3-none-any.whl.metadata (4.4 kB)
    Requirement already satisfied: six in /usr/lib/python3/dist-packages (from stormssh) (1.16.0)
    Requirement already satisfied: termcolor in /usr/local/lib/python3.12/dist-packages (from stormssh) (2.5.0)
    Requirement already satisfied: cryptography<45,>=41.0.5 in /usr/lib/python3/dist-packages (from pyopenssl) (41.0.7)
    Requirement already satisfied: typing-extensions>=4.9 in /usr/local/lib/python3.12/dist-packages (from pyopenssl) (4.12.2)
    Requirement already satisfied: Werkzeug>=3.1 in /usr/local/lib/python3.12/dist-packages (from flask->stormssh) (3.1.3)
    Requirement already satisfied: Jinja2>=3.1.2 in /usr/local/lib/python3.12/dist-packages (from flask->stormssh) (3.1.5)
    Requirement already satisfied: itsdangerous>=2.2 in /usr/local/lib/python3.12/dist-packages (from flask->stormssh) (2.2.0)
    Requirement already satisfied: click>=8.1.3 in /usr/lib/python3/dist-packages (from flask->stormssh) (8.1.6)
    Collecting blinker>=1.9 (from flask->stormssh)
      Using cached blinker-1.9.0-py3-none-any.whl.metadata (1.6 kB)
    Requirement already satisfied: bcrypt>=3.2 in /usr/lib/python3/dist-packages (from paramiko->stormssh) (3.2.2)
    Requirement already satisfied: pynacl>=1.5 in /usr/lib/python3/dist-packages (from paramiko->stormssh) (1.5.0)
    Requirement already satisfied: MarkupSafe>=2.0 in /usr/local/lib/python3.12/dist-packages (from Jinja2>=3.1.2->flask->stormssh) (3.0.2)
    Requirement already satisfied: cffi>=1.4.1 in /usr/local/lib/python3.12/dist-packages (from pynacl>=1.5->paramiko->stormssh) (1.17.1)
    Requirement already satisfied: pycparser in /usr/local/lib/python3.12/dist-packages (from cffi>=1.4.1->pynacl>=1.5->paramiko->stormssh) (2.22)
    Using cached flask-3.1.0-py3-none-any.whl (102 kB)
    Using cached paramiko-3.5.0-py3-none-any.whl (227 kB)
    Using cached blinker-1.9.0-py3-none-any.whl (8.5 kB)
    Installing collected packages: blinker, flask, paramiko, stormssh
      Attempting uninstall: blinker
        Found existing installation: blinker 1.7.0

    :stderr: ERROR: Cannot uninstall blinker 1.7.0, RECORD file not found. Hint: The package was installed by debian.
Cause:
The blinker package was installed via apt repository instead pip.
Solution #1: More safety way.
Determinate the package that is used as a dependency and try to install via apt. In our case, the Flask version 3.1.0 requires blinker version 1.9.0. However blinker package was installed via apt and python cannon overwrite it. If install Flask package via apt repository it will install Flask version 3.0.2 version which works with blinker version 1.7.0.
Solution #2: Less safety way.
Lets using directly execution pip with param as --break-system-packages
pip install --force-reinstall blinker==1.9.0 --break-system-packagesSSH and signed keys by Vault
Hey there,
Today I would like to share a new topic regarding Vault as service for signed SSH keys.
How it works
Descriptions:
- Vault keeps certificates and signed user's public key and provide a temp key for auth on a target host.
- Target host has a predefined cert on
sshd_config. The same cert should be deployed on Vault - User needs sign public key before make ssh connect to the target host
Advantages:
- Easy access control who have to connect to the target host
- The target host might be exists a just one user
- User access limited by TTL by signed cert
- Vault can manage the additional SSH features as
port-forwardingand etc
Disadvantages:
- Vault as additional point of fail
- User have to use a different behavior, not like before with pure SSH connect
- Need care about rotation certs
Scheme

Configuration
Create the secret mount for SSH certs manage
$ vault secrets enable -path=ssh-sign ssh
Create a policy
$ vault policy write my-policy -<<"EOF"
path "ssh-sign/sign/ubuntu" {
  capabilities = ["create","update"]
}
EOF
Upload created and signed CA or Intermediate cert
$ vault write ssh-sign/config/ca \
    private_key=@cert.pem \
    public_key=@key.pem
Get trusted-user-ca-keys.pem then it need uploading to the target host
$ vault read -field=public_key ssh-sign/config/ca > /etc/ssh/trusted-user-ca-keys.pem
Update sshd_config on the target host
...
TrustedUserCAKeys /etc/ssh/trusted-user-ca-keys.pem
...
Create a ubuntu role
"algorithm_signer": "rsa-sha2-512" Is it very important without option we have problem with auth to target host.
$ vault write ssh-sign/roles/ubuntu -<<"EOH"
{
  "allow_user_certificates": true,
  "algorithm_signer": "rsa-sha2-512",
  "allowed_users": "*",
  "allowed_extensions": "permit-pty,permit-port-forwarding",
  "default_extensions": [
    {
      "permit-pty": ""
    }
  ],
  "key_type": "ca",
  "default_user": "ubuntu",
  "ttl": "30m0s"
}
EOH
On client side we need generate the private and public keys
$ ssh-keygen -t rsa -C "user@domain.com"
Sign a public key by Vault
$ vault write ssh-sign/sign/ubuntu \
    public_key=@<path-to-your-id_rsa.pub>
Store a signed key on localhost
$ vault write -field=signed_key ssh-sign/sign/ubuntu \
    public_key=@<path-to-your-id_rsa.pub> > signed-cert.pub
Check connect to the target host
We make sure you use two keys. One signed and other created before without it magic can't happend.
$ ssh -i signed-cert.pub -i ~/.ssh/id_rsa ubuntu@<TARGET_HOST>
How does it check a signed cert
$ ssh-keygen -Lf ~/.ssh/signed-cert.pub
# An example output

signed-cert.pub:
        Type: ssh-rsa-cert-v01@openssh.com user certificate
        Public key: RSA-CERT SHA256:XXX
        Signing CA: RSA SHA256:XXX (using rsa-sha2-512)
        Key ID: "vault-ldap-user-xxx"
        Serial: 11111111111111111111
        Valid: from 2023-09-10T15:13:55 to 2023-09-10T15:44:25
        Principals:
                ubuntu
        Critical Options: (none)
        Extensions:
                permit-pty
The security in Nomad Cluster
Hello everyone,
Note: I will skipped a process installation Nomad, Consul, Traefik and Vault instances. It will take a focus on details to setup configurations and the definitions of jobs.
Description: The main mission of the topic to provide the full picture how we can defend and improve the security in the Nomad cluster.
Also it will be cover mTLS connectivity between all services in Nomad cluster.
Just one port is open to reach the cluster. As example 8443;
Scheme:
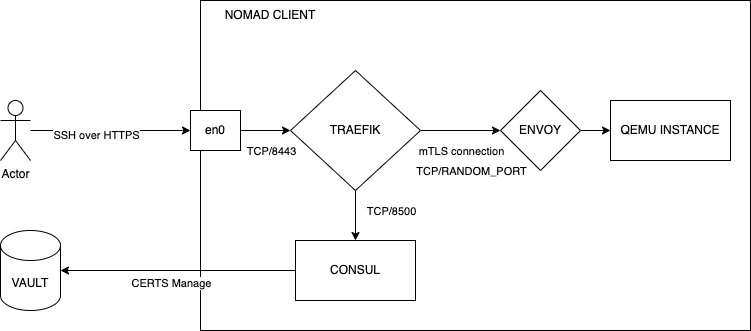
Requirements:
Nomad
The orchestrator under QEMU, containers, JAVA and etc instances...
** It depends what do you want the kind of a driver on job would run: QEMU or Docker
Consul
The feature as Service Mesh and Service Discover requires for store services in catalog
** Optional: Can running as Service task into Nomad Cluster
Vault
Security storage for storing sensetive data.
** Optional: Can running as Service task into Nomad Cluster
Traefik v3.0
Just load-balancer with much useful features
** Note: Only v3.0 supports TCPTransport
** Optional: Also can running into Nomad
Configurations:
Nomad:
On server side:
Make sure nomad server nodes have been defined vault stanza
vault {
  enabled          = true
  address          = "<VAULT_ADDR>"
  token            = "<VAULT_TOKEN>"
  create_from_role = "nomad-cluster"
}
On client side:
Client nodes also have to defined vault stanza, but without vault_token.
Also these nodes have to had consul stanza. The address 127.0.0.1:8500 because as I mentioned before consul will running inside Nomad cluster.
vault {
  enabled          =  true
  address          = "<VAULT_ADDR>"
}

consul {
  address             = "127.0.0.1:8500"
  grpc_address        = "127.0.0.1:8502"
  client_service_name = "nomad-client" # It is just the name of service on Consul
  auto_advertise      = true
  client_auto_join    = true
}
Consul:
The most important here is connect stanza. The responsible for the connection to Vault.
PKI Certificates required for create temp cert and manage mTLS termination between services.
connect {
    enabled = true
    ca_provider = "vault"
    ca_config {
        address = "<VAULT_ADDR>"
        token = "<VAULT_TOKEN>"
        root_pki_path = "consul1/connect_root"
        intermediate_pki_path = "consul1/connect_intermediate"
    }
}
Vault:
Make sure Vault cluster exists all policies and provided tokens are valid.
Policies:
Note: Similar examples you can find on the official documentation site.
- Nomad cluster policy. Provided VAULT_TOKEN or APP_ROLE have to assign to the policy.
# Allow creating tokens under "nomad-cluster" role. The role name should be
# updated if "nomad-cluster" is not used.
path "auth/token/create/nomad-cluster" {
  capabilities = ["update"]
}

# Allow looking up "nomad-cluster" role. The role name should be updated if
# "nomad-cluster" is not used.
path "auth/token/roles/nomad-cluster" {
  capabilities = ["read"]
}

# Allow looking up the token passed to Nomad to validate the token has the
# proper capabilities. This is provided by the "default" policy.
path "auth/token/lookup-self" {
  capabilities = ["read"]
}

# Allow looking up incoming tokens to validate they have permissions to access
# the tokens they are requesting. This is only required if
# `allow_unauthenticated` is set to false.
path "auth/token/lookup" {
  capabilities = ["update"]
}

# Allow revoking tokens that should no longer exist. This allows revoking
# tokens for dead tasks.
path "auth/token/revoke-accessor" {
  capabilities = ["update"]
}

# Allow checking the capabilities of our own token. This is used to validate the
# token upon startup.
path "sys/capabilities-self" {
  capabilities = ["update"]
}

# Allow our own token to be renewed.
path "auth/token/renew-self" {
  capabilities = ["update"]
}
- Consul policy:
path "/sys/mounts" {
  capabilities = [ "read" ]
}

path "/sys/mounts/consul1/connect_root" {
  capabilities = [ "read" ]
}

path "/sys/mounts/consul1/connect_intermediate" {
  capabilities = [ "read" ]
}

# Needed for Consul 1.11+
path "/sys/mounts/consul1/connect_intermediate/tune" {
  capabilities = [ "update" ]
}

path "/consul1/connect_root/" {
  capabilities = [ "read" ]
}

path "/consul1/connect_root/root/sign-intermediate" {
  capabilities = [ "update" ]
}

path "/consul1/connect_intermediate/*" {
  capabilities = [ "create", "read", "update", "delete", "list" ]
}

path "auth/token/renew-self" {
    capabilities = [ "update" ]
}

path "auth/token/lookup-self" {
    capabilities = [ "read" ]
}
Traefik:
Make sure traefik configuration exists below options:
[providers.consulCatalog]
  prefix           = "traefik"
  serviceName      = "traefik"
  connectAware     = true
  connectByDefault = false
  exposedByDefault = false

  [providers.consulCatalog.endpoint]
    address = "127.0.0.1:8500" # Use VALUE from nomad variables
    datacenter = "<CONSUL_NAME_DC>"
    scheme  = "http"
The definition of jobs:
All jobs defined on HCL format and might be running on Nomad cluster.
* Trying to describe all important things mentioned at the HCL file
Be careful the
<VARIABLES>should be replaced
Consul job definition:
job "consul-all-in-one" {
  datacenters = ["dc1"]
  namespace = "experimental"
  type = "system"

  group "consul-agent" {

    network {
      mode = "host"

      port "consul_server"   {
        static = "8300"
      }
      port "consul_serf_lan" {
        static = "8301"
      }
      port "consul_serf_wan" {
        static = "8302"
      }
      port "consul_rpc"      {
        static = "8400"
      }
      port "consul_http"     {
        static = "8500"
      }
      port "consul_grpc"     {
        static = "8502"
      }
      port "consul_dns"      {
        static = "8600"
      }
    }

    task "consul-server" {
      driver = "docker"

      template {
          destination = "./config/conf.d/config.hcl"
          left_delimiter = "[["
          right_delimiter = "]]"
          data = <<EOH
log_level = "DEBUG"
datacenter = "consul1"
server = true
bootstrap_expect = 3
retry_join = [
    "<NOMAD_CLIENT_#1>",
    "<NOMAD_CLIENT_#2>",
    "<NOMAD_CLIENT_#3>",
]
recursors = [
    "8.8.8.8",
    "8.8.4.4"
]
client_addr = "0.0.0.0"
bind_addr      = "{{ GetInterfaceIP \"en0\" }}"
advertise_addr = "{{ GetInterfaceIP \"en0\" }}"

connect {
    enabled = true
    ca_provider = "vault"
    ca_config {
        address = "<VAULT_ADDR>"
        token = "<VAULT_TOKEN>"
        root_pki_path = "consul1/connect_root"
        intermediate_pki_path = "consul1/connect_intermediate"
    }
}
addresses {
    http = "0.0.0.0"
}
ports {
    grpc = 8502
}
ui_config {
    enabled = true
}
auto_encrypt {
    allow_tls = false
}
acl {
    enabled = true
    default_policy = "allow"
}
EOH
      }

      config {
        image = "hashicorp/consul:1.13.0"
        command = "agent"
        volumes = [
            "./config/conf.d/config.hcl:/consul/config/config.hcl",
            "./config/tls/agent.pem:/consul/config/tls/agent.pem",
            "./config/tls/agent.key:/consul/config/tls/agent.key",
            "./config/tls/ca.pem:/consul/config/tls/ca.pem",
        ]
        network_mode = "host"
        ports = [
            "consul_server",
            "consul_serf_lan",
            "consul_serf_wan",
            "consul_rpc",
            "consul_http",
            "consul_dns",
            "consul_grpc"
        ]
        mount {
          type = "volume"
          target = "/consul/data"
          source = "consul-data"
          readonly = false
        }
      }
      service {
        name = "consul"
        provider = "nomad"
      }
      resources {
        cpu    = 500 # Mhz
        memory = 256 # MB
      }
    }
  }
}
Traefik job definition
variable "image_version" {
type = string
default = "traefik:v3.0"
}
variable "namespace" {
type = string
default = "experimental"
}
job "traefik" {
datacenters = ["dc1"]
namespace = "${var.namespace}" # change to admin ns
constraint {
attribute = "${attr.unique.hostname}"
operator = "set_contains_any"
value = "<SPECIFIC_NOMAD_CLIENT>"
}
group "traefik" {
network {
mode = "bridge"
port "api" {
static = 8081
}
port "http" {
static = 8080
}
port "https" {
static = 8443
}
}
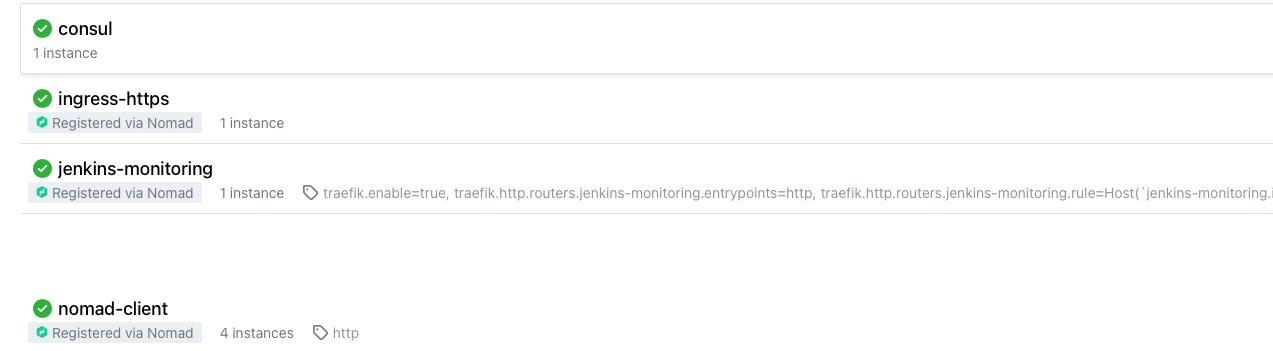
service {
name = "ingress-https"
port = "https"
connect {
native = true
}
}
task "traefik" {
driver = "docker"
config {
image = "${var.image_version}"
force_pull = true
volumes = [
"local/traefik.toml:/etc/traefik/traefik.toml",
"local/ssl:/etc/traefik/ssl",
]
}
template {
data = <<EOF
-----BEGIN CERTIFICATE-----
HERE CAN BE YOUR CERT or `Traefik` CAN CARE ABOUT IT.
-----END CERTIFICATE-----
EOF
destination = "local/ssl/proxy01.cert"
}
template {
data = <<EOF
-----BEGIN PRIVATE KEY-----
HERE CAN BE YOUR PK or `Traefik` CAN CARE ABOUT IT.
-----END PRIVATE KEY-----
EOF
destination = "local/ssl/proxy01.key"
}
template {
data = <<EOF
[global]
checkNewVersion = false
sendAnonymousUsage = false
[log]
level = "DEBUG"
[entryPoints]
[entryPoints.http]
address = ":8080"
[entryPoints.https]
address = ":8443"
[entryPoints.traefik]
address = ":8081"
[api]
dashboard = true
insecure = true
debug = true
[providers.consulCatalog]
prefix = "traefik"
serviceName = "traefik"
connectAware = true
connectByDefault = false
exposedByDefault = false
[providers.consulCatalog.endpoint]
address = "<NOMAD_CLIENT_IP:NOMAD_CLIENT_PORT>" # Use VALUE from nomad variables
datacenter = "cluster1"
scheme = "http"
[serversTransport]
insecureSkipVerify = true
[tcpServersTransport]
insecureSkipVerify = true
[providers.file]
directory = "/etc/traefik"
watch = true
[tls]
[[tls.certificates]]
certFile = "/etc/traefik/ssl/proxy01.cert"
keyFile = "/etc/traefik/ssl/proxy01.key"
[tls.stores]
[tls.stores.default]
[tls.stores.default.defaultCertificate]
certFile = "/etc/traefik/ssl/proxy01.cert"
keyFile = "/etc/traefik/ssl/proxy01.key"
EOF
destination = "local/traefik.toml"
}
resources {
cpu = 100
memory = 128
}
}
}
}
The simple QEMU instance with SSH
job "simple01" {
  datacenters = ["dc1"]
  namespace   = "experimental"

  meta {
    qcow_name = "simple01.qcow2"
    srv_ssh_port = 25001
    srv_rdp_port = 25002
  }

  group "qemu" {
    network {
      mode = "bridge"
    }

    service {
      name = "${NOMAD_JOB_NAME}"
      port = "${NOMAD_META_srv_ssh_port}"
      tags = [
        "traefik.enable=true",
        "traefik.consulcatalog.connect=true",
        "traefik.tcp.routers.${NOMAD_JOB_NAME}.entrypoints=https",
        "traefik.tcp.routers.${NOMAD_JOB_NAME}.tls=true",
        "traefik.tcp.routers.${NOMAD_JOB_NAME}.rule=HostSNI(`${NOMAD_JOB_NAME}.domain.com`)",
        "traefik.tcp.routers.${NOMAD_JOB_NAME}.service=${NOMAD_JOB_NAME}",
      ]
      connect {
        sidecar_service {}
      }
    }

    task "run-compute-instance" {
      driver = "qemu"

      artifact {
        source = "https://artifactory.com/artifactory/images/${NOMAD_META_qcow_name}"
        destination = "packer-focal2004"
      }

      resources {
        cpu = 2000
        memory = 4096
      }

      config {
        image_path = "packer-focal2004/${NOMAD_META_qcow_name}"
        accelerator = "kvm"
        args = [
          "-vnc", "none,ipv4",
          "-device", "virtio-net,netdev=user.0",
          "-netdev", "user,id=user.0,hostfwd=tcp::${NOMAD_META_srv_ssh_port}-:22,hostfwd=tcp::${NOMAD_META_srv_rdp_port}-:8443"
        ]
      }
    }
  }
}
How it works:
Nomad:
- The job has a definition
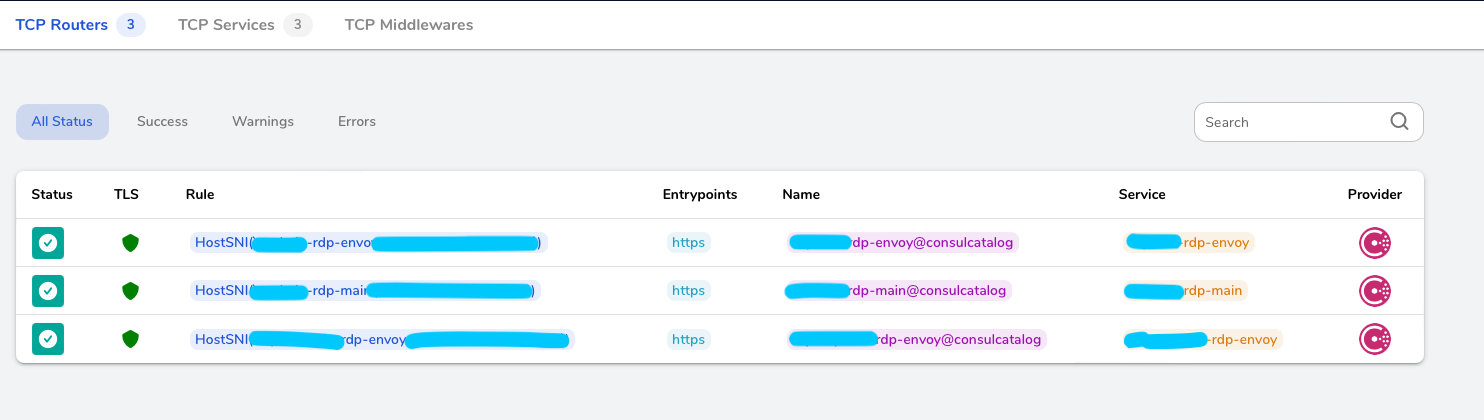
connectandsidecar_servicestanzes; Nomad will pass request of create service to Consul. Then that will creating a service by name option inservicestanza; - The
tagsstanza. Traefik will be relying on these tags and register routers and services; - The
sidecar_serviceworks only withConsul Service Discovery,Nomad Service Discoverdoesn’t support it. The stanza means Nomad will be runningexvoy-proxytask, a together with general task, which can manage a network traffic; - Do not need run Nomad job with predefined ports; Consul will be know that service using envoy-proxy.
Consul:
- It requires just one think, but it is really important. It is manage certificates. By that action configuration defined connect stanza and Vault instance;
Vaultsecret paths asconsul1/connect_intermediateandconsul1/connect_rootcreated by Consul automatic. It requires a specificVaultpolicy;- These secret paths can safety removed and Consul will be recreate them in during restart;
Traefik:
- Should be listen at least two ports. HTTP and TCP traffic; If need UI also API should be opened;
- Because traefik is a LB and make terminate TLS sessions, we need keep root domain certs or use letsencrypt;
- Certificates defined in a config file. Traefik should use a config file as a provider.
- Other provider is Consul instance, it also have to defined in config file; Usually traefik re-read service discovery each few seconds and rely on tags;
tags = [
    "traefik.enable=true",
    "traefik.consulcatalog.connect=true",
    "traefik.tcp.routers.${NOMAD_JOB_NAME}.entrypoints=https",
    "traefik.tcp.routers.${NOMAD_JOB_NAME}.tls=true",
    "traefik.tcp.routers.${NOMAD_JOB_NAME}.rule=HostSNI(`${NOMAD_JOB_NAME}.domain.com`)",
    "traefik.tcp.routers.${NOMAD_JOB_NAME}.service=${NOMAD_JOB_NAME}"
]
The final step:
After update list of services, traefik will be registering routers and services on own side;
The example, user can join to target host through HTTPS to QEMU host by SSH
After success configuration and have been deployed all services and jobs. You can run command:
$ ssh -o "ProxyCommand=openssl s_client -quiet -servername %h -connect <loadbalancer_host>:<loadbalancer_port>" <target_hostname>
Top 5 docker commands which rare using.
However they are really helpful in during troubleshouting process.
- How to check mounted volumes into container
Docker inspect provide broad information about running container.
As example it can helpful for understand how does a container running.
# docker inspect <CONTAINER_ID> --format "{{.Mounts}}"

OUTPUT:

[{volume loki_data /var/lib/docker/volumes/loki_data/_data /tmp local rw true }]
- Check layouts on images
The command presents all layouts which was used in due build an image
# docker history <IMAGE_ID>

OUTPUT:

IMAGE          CREATED       CREATED BY                                      SIZE      COMMENT
6a72af05e4cd   3 weeks ago   ENTRYPOINT ["/opt/main"]                        0B        buildkit.dockerfile.v0
<missing>      3 weeks ago   COPY /opt/sources/main /opt/main # buildkit     14.4MB    buildkit.dockerfile.v0
<missing>      3 weeks ago   RUN /bin/sh -c apk add curl # buildkit          6.02MB    buildkit.dockerfile.v0
<missing>      4 weeks ago   /bin/sh -c #(nop)  CMD ["/bin/sh"]              0B
<missing>      4 weeks ago   /bin/sh -c #(nop) ADD file:32ff5e7a78b890996…   7.34MB
- Use filter and search in a container logs
That isn't a simple shows logs and also apply filter and search inside.
# docker logs <CONTAINER_ID> > service.log 2>&1; less service.log
- Remove all containers with state is
Exited
The bash command uses the inhire expansion in the regular docker command as rm.
# docker rm $(docker ps -a --filter state=exited --format "{{.ID}}")

OUTPUT:

eba7c4377515
95453b1629a6
- Show statictics on running services on Docker
That command presents main metrics as CPU, RAM and Network are using in current time per container or all containers
# docker stats

OUTPUT:

CONTAINER ID   NAME                            CPU %     MEM USAGE / LIMIT     MEM %     NET I/O           BLOCK I/O         PIDS
eba7c4377515   container_1                     93.39%    26.83MiB / 15.66GiB   0.17%     1.26TB / 256GB    65.2MB / 180kB    9
95453b1629a6   container_2                     47.55%    36.37MiB / 15.66GiB   0.23%     873GB / 4.12TB    44.7MB / 24.7GB   10
7bb9024de518   container_3                     0.00%     5.922MiB / 15.66GiB   0.04%     10.6MB / 196MB    7.84MB / 0B       5
4c720b536401   container_4                     0.59%     2.164GiB / 15.66GiB   13.81%    133GB / 654GB     16GB / 10.6GB     224
Grap
Description
If you heard about a monorepo. You have to know there aren't the easy way to grab a single file from that.
As an experiment and process of learning Golang grab is small tool to resolve that.
Link: Grab
Current version only for the linux distributives.
TODO:
- Implement TestCases
- Check on different environments as MacOS, Windows
How to build
$ go build cmd/grab/*
How to use
Use by default:
- Current username and
id_rsa - Branch
main - File
README.mdfrom root directory
To get a help information
$ ./grab --help

Usage of ./grab:
  -commit string
    	Example CommitId
  -file string
    	Example FilePath (default "README.md")
  -pk string
    	Example PrivateKey (default "/home/<username>/.ssh/id_rsa")
  -refs string
    	Example Refs (default "refs/heads/main")
  -repo string
    	Example RepoAddr (default "https://github.com/RYunisov/atomic-notes.git")
  -skip-auth
    	Skip Auth by Default (default true)
  -user string
    	Example Username (default "<username>")
To get a specific file from a specific commit from master branch
$ ./grab -repo=ssh://<any-repo.git> \
         -user=<username> \
         -refs=refs/heads/master \
         -file=<full-path-to-file> \
         -commit=<commit-hash> \
         -skip-auth=false
How to update size of a block device without reboot
We often faced a situation to update size of block devices without reboot VM machine.
Note: The solution verified on Debian-based distributions.
echo 1 > /sys/block/sd*/device/rescan
To check an updated size by tools as fdisk, cfdisk and etc.
Why we have to use Packer as docker-image builder?
Advantages:
- That has several plugins to build images as Docker, QEMU and etc
- It has a native support Vault. Constructions aren't necessary which have had contained consul-template or Vault agent in during build image
- Don’t require to know Dockerfile syntax
- Support several provision like as shell, ansible
- Packer hasn’t layouts
- Also support several stages of building
Disadvantages:
- Packer hasn’t layouts. You can't use a native feature docker as cache. If image is too big, it take a long time for update, push and pull
- Can’t setup a default user
- That requires a little bit an experience in json, hcl format
Metadatais only one option provide access to pure Dockerfile commands
The instance of a docker-image building
packer {
  required_plugins {
    docker = {
      version = ">=0.0.7"
      source  = "github.com/hashicorp/docker"
    }
  }
}

variable "docker_image" {
  type    = string
  default = "debian:stable-slim"
}

variable "docker_tag" {
  type    = string
  default = "master"
}

local "docker_login" {
  expression = vault("secrets/data/jenkins/user", "username")
  sensitive  = true
}

local "docker_password" {
  expression = vault("secrets/data/jenkins/pass", "password")
  sensitive  = true
}

source "docker" "debian" {
  image  = var.docker_image
  commit = true
}

build {
  name = "nomad-client"

  sources = [
    "source.docker.debian"
  ]

  provisioner "shell" {
    inline = [
      "apt update && apt install -y curl unzip",
      "curl -O https://releases.hashicorp.com/nomad/1.3.4/nomad_1.3.4_linux_amd64.zip",
      "unzip nomad_1.3.4_linux_amd64.zip -d /usr/sbin && rm -rf nomad_1.3.4_linux_amd64.zip",
      "apt-get clean autoclean",
      "apt-get autoremove --yes",
      "rm -rf /var/lib/{apt,dpkg,cache,log}"
    ]
  }

  post-processors {

    post-processor "docker-tag" {
      repository = "docker-test.example.com/nomad"
      tags       = [
        "latest",
        "${var.docker_tag}"
      ]
    }

    post-processor "docker-push" {
      login          = true
      login_username = local.docker_login
      login_password = local.docker_password
      login_server   = "docker-test.example.com"
    }

  }
}
Vault and transit key
Description:
Vault can cover a sensitive data by transit key. Transit key can store outside Vault.
As instance the data covered by transit key on Vault:
some_api_token = {
    accessor_id = "vault:v1:N76+aQS2WTEeNHp/W1FF6olPnRFUaYPAFTkzfGOpOzNTl+quqBClVJYNNIEep/tkJ7w7UirbiEv1QDuOSpzuDg=="
    secret_id   = "vault:v1:mDzHh6nIShpva50/fKeJVv8kMk9r3JkJFlHpKouNBDfUiAet8aWRLTpTje/Tkp5GNBe4GjySNq++W1Hq7Wcj6w=="
}
As an example the feature can use to cover a sensitive data in Terraform
How to do use it
Create secret engine and create key
Make sure kind of secret is enabled:
$ vault secret list
Path          Type         Accessor              Description
----          ----         --------              -----------
transit/      transit      transit_cf2e9807      n/a
In case if it disabled. Enabled it:
$ vault secret enable transit
Success! Enabled the transit secrets engine at: transit/
Create an example transit key:
$ vault write transit/encrypt/my-example-key plaintext=$(echo "my secret data" | base64)
Key           Value
---           -----
ciphertext    vault:v1:8SDd3WHDOjf7mq69CyCqYjVVViQQAVZRkFM13ok481zoCmHnSeDX9vyf7w==
Backup the key:
Check a ciphertext for a key:
$ vault read transit/backup/my-example-key
Key       Value
---       -----
backup    XXXXX
Store the backup value in the other secret store like as 1Password, LastPass or etc.
Restore key:
Create the secret engine with type transit:
$ vault secret enable transit
Rollup a backup key:
$ export CIPHERTEXT="<text_from_last_pass_in_base64>"
$ vault write transit/restore/my-example-key backup=$CIPHERTEXT
Check a restore key:
vault read transit/backup/my-example-key
Nginx output through different interfaces
Sometime we faced with different challenges and most important think it implements that as soon is possible and more elegance.
Imagine a situation, we have just only one interface for incoming requests and you need to use other interfaces just for output traffic.
Nginx have it out of box.
Scheme like that:
->  192.168.1.99
X   192.168.1.10 ->
X   192.168.1.20 ->
X   192.168.1.30 ->
- Usually
nginxexists module asngx_http_split_clients_module - Configure
nginxadd block withsplit_clients
split_clients "$request_uri$remote_port" $split_ip {
    33%    192.168.1.10;
    33%    192.168.1.20;
    33%    192.168.1.30;
    *      192.168.1.10;
}

location / {
   proxy_bind $split_ip;
   ...
}
- Check it
Just run tcpdump and check output traffic to backend`
# tcpdump -npi any host 192.168.1.30
Nginx as reserse-proxy for SSH
You need create a stream and defined SSL
stream {

    map $ssl_server_name $target_backend {
        host01 192.168.10.223:22;
        host02 192.168.10.222:22;
        host03 192.168.10.112:22;
    }

    server {

        listen 8443 ssl;
        ssl_certificate /etc/letsencrypt/live/ssl/fullchain.pem;
        ssl_certificate_key /etc/letsencrypt/live/ssl/privkey.pem;
        ssl_dhparam /etc/letsencrypt/ssl-dhparams.pem;

        proxy_pass      $target_backend;

    }

}
Command example to run SSH connect will be look like below:
ssh -o "ProxyCommand=openssl s_client -quiet -servername %h -connect <IP_LOADBALACE>:8443" host01
How to check type of linked libraries
- Use
fileutil
If you check output, you can see dynamically linked. It means binary use dynamic library
$ file /usr/local/bin/virtiofsd
# OUTPUT
# /usr/local/bin/virtiofsd: ELF 64-bit LSB shared object, x86-64, version 1 (SYSV), dynamically linked, interpreter /lib64/ld-linux-x86-64.so.2, for GNU/Linux 3.2.0, BuildID[sha1]=cc1ae0ebccbe96dbd7d7012980b00bf76311fc08, with debug_info, not stripped
- To check libraries and where is pointed use
lddutil
Libs which linking with => will use shared lib(dynamic). Also user can rewrite it use env LD_LIBRARY_PATH
ldd /usr/local/bin/virtiofsd

# OUTPUT
# linux-vdso.so.1 (0x00007ffecf1f8000)
# libseccomp.so.2 => /lib/x86_64-linux-gnu/libseccomp.so.2 (0x00007f20719ef000)
# libcap-ng.so.0 => /lib/x86_64-linux-gnu/libcap-ng.so.0 (0x00007f20719e7000)
# libgcc_s.so.1 => /lib/x86_64-linux-gnu/libgcc_s.so.1 (0x00007f20719cc000)
# librt.so.1 => /lib/x86_64-linux-gnu/librt.so.1 (0x00007f20719c2000)
# libpthread.so.0 => /lib/x86_64-linux-gnu/libpthread.so.0 (0x00007f207199f000)
# libm.so.6 => /lib/x86_64-linux-gnu/libm.so.6 (0x00007f2071850000)
# libdl.so.2 => /lib/x86_64-linux-gnu/libdl.so.2 (0x00007f2071848000)
# libc.so.6 => /lib/x86_64-linux-gnu/libc.so.6 (0x00007f2071656000)
# /lib64/ld-linux-x86-64.so.2 (0x00007f2071c04000)
- Case with
statically linked
$ file ../helmsman
../helmsman: ELF 64-bit LSB executable, x86-64, version 1 (SYSV), statically linked, Go BuildID=giKpqB_eEQ4pCsw_zwab/HXVXhwhlCd8onwlovFAY/b_HNul8q2i32pIwivh31/vGA8O26tkLqxQW-WXnoN, stripped

$ ldd ../helmsman
not a dynamic executable
How to Jenkins retrieve secrets from Hashicorp Vault
Let's see an example to store sensetive data in Hashicorp Vault and retrive these values in Jenkins pipeline;
Preparation
- Vault
- Jenkins
- Hashicorp Vault plugin:
359.v2da_3b_45f17d5
- Hashicorp Vault plugin:
Steps
Create KV secret in Vault.
$ vault kv put jenkins/foo key=secret
Prepare policy. That needs to separate permissions between other authorized users, approles and etc.
$ cat <<EOF> jenkins-policy.hcl
path "jenkins/data/*" {
  capabilities = ["read"]
}
Note: Path contains
/data/this isn't mistake, it's important part of path for KV version 2.
Create the policy in Vault.
$ vault policy write jenkins-policy ./jenkins-policy.hcl
Basically vault provides several options to auth. Create a new auth engine as approle.
We use the auth engine because it using like as service_account and easy to integrate with Jenkins.
$ vault write auth/approle/role/jenkins \
    secret_id_ttl=0 \
    token_ttl=20m \
    token_max_ttl=30m \
    token_policies="jenkins-policy"
Get role_id for a created appRole
$ vault read auth/approle/role/jenkins/role-id

# role_id     db02de05-fa39-4855-059b-67221c5c2f63
Get secret_id for a created appRole.
Note: If you already use
secret_idthat cmd will overriding old value.
$ vault write -f auth/approle/role/jenkins/secret-id

# secret_id               6a174c20-f6de-a53c-74d2-6018fcceff64
# secret_id_accessor      c454f7e5-996e-7230-6074-6ef26b7bcf86
# secret_id_ttl           10m
# secret_id_num_uses      40
In case if you would like to check what policies assigned or get token.
$ vault read auth/approle/login \
    role_id=db02de05-fa39-4855-059b-67221c5c2f63 \
    secret_id=6a174c20-f6de-a53c-74d2-6018fcceff64

Key                     Value
---                     -----
token                   s.XXXXX
token_accessor          XXXXX
token_duration          20m
token_renewable         true
token_policies          ["default" "jenkins-policy"]
identity_policies       []
policies                ["default" "jenkins-policy"]
token_meta_role_name    jenkins
In Jenkins side requires to create a credential as appRole
Go to:
Manage Jenkins -> Manage Credentials -> Use global -> Add Credentials -> Vault App Role Credential
See an example filled fields:
Role ID:      db02de05-fa39-4855-059b-67221c5c2f63
Secret ID:    6a174c20-f6de-a53c-74d2-6018fcceff64
Path:         approle
Namespace:
ID:           vault-jenkins-approle
Description:  AppRole for Jenkins
Also need setup connect Jenkins and Vault
Go to:
Manage Jenkins -> Configure System -> Vault Plugin
Vault URL:        https://vault.local
Vault Credential: AppRole for Jenkins
This is all for connect Jenkins and Vault. Next steps are describe as get KV secret from Vault
Define an example secret in Jenkins
Go to:
Manage Jenkins -> Manage Credentials -> Use global -> Add Credentials -> Vault Secret Text Credential
See an example filled fields:
Namespace:          <STAY EMPTY>
Prefix Path:        <STAY EMPTY>
Path:               jenkins/secret01
Vault Key: key      key
K/V Engine Version: 2
ID:                 vault-secret01
Description:        Vault Example SecretKey
Note: If you click
Test Vault Secrets retrivalJenkins tries to get value from Vault.
Create a simple job with kind as declarative pipeline
Note: Result might be find in .secret file in Workspace of job.
pipeline {
    agent any
    environment {
        SECRET = credentials('vault-secret01')
    }
    stages {
        stage("Apply secret") {
            steps {
                sh("echo ${SECRET} > .secret")
            }
        }
    }
}